Hello dear reader, in my article, We are working on Ahnlich, a Database to Aid Semantic Search I gave an introduction to the project I have been working on recently. In that piece, I promised to write a couple of articles, of which this is the first one I am taking a stab at.
As a quick reminder, Ahnlich is a suite of tools built to ease the developer workflow for integrating semantic search functionality into products and services. It provides a database (Ahnlich-db), an embedding service (Ahnlich-ai), a CLI service (Ahnlich-cli), and various language clients. A significant amount of my contributions to Ahnlich have been to the embedding service, which is why I thought it interesting to write about some surprises I encountered while building.
Here are the surprises I will be writing about:
- Varying Image Decoding Implementations
- The Dip in Similarity Scores for Image-Text Data
- The Importance of Model-Specific Preprocessing
Before I get into writing about the surprises, here is some useful context about what the embedding service does.
Ahnlich-ai Context
What does Ahnlich-ai do?
Ahnlich-ai is an embedding service that takes in some input—which can be an image or text, as at the time of writing—and then returns vectors. When Ahnlich-ai is started, it loads up a set of supported models, and these models can be used to generate embeddings. The models to be loaded up are either provided as an argument or not, in which case Ahnlich-ai falls back to the default set. When Ahnlich-ai returns embeddings, the hope is that they contain information that can be relied on to convey similarity between multiple items and can be used for semantic search tasks.
How does Ahnlich-ai do it?
The embedding service relies on huggingface_hub and the onnxruntime to pull model weights and generate embeddings, respectively.
Hugging Face is a platform that enables machine learning experimentation and development. Hugging Face has a hub that hosts more than 900k models and 200k datasets; it is via this hub that Ahnlich gets the model configurations and ONNX model weights used to convert inputs into embeddings. The ONNX Runtime is a machine learning tool that makes it possible to run inference with ONNX models; it provides optimizations and accelerations that reduce inference time. ONNX (Open Neural Network Exchange) is an intermediary representation for machine learning models, making models accessible across various machine learning frameworks and programming languages.
I think this context should suffice, but if you want to learn more you can read the Ahnlich introduction article. Let us dive right into the surprises.
Varying Image Decoding Implementations
When looking to add the image-to-embeddings functionality, the team hoped to find existing crates that have done a large part of this work. We found one, called fastembed-rs; which is a Rust implementation of Python’s fastembed package. It was great at the start, but it had one limitation—at least for Ahnlich’s use case—which is that it always runs preprocessing on the image before inference. For Ahnlich, this was not great because we wanted to give users the choice of using custom or model-specific preprocessing.

To make this work, the first approach was to find a way to access the methods for doing direct inference without calling the preprocessing logic. However, most of those functions were private and not visible to consumers of the crate, meaning there was no way to call them.
The next approach was to lift the implementation from fastembed-rs into the Ahnlich-ai project. However, this was not seamless considering that project structures differ and we were only interested in a tiny bit of the code—the inference code. We had to do a considerable rewrite on the lifted code. This worked, but since the implementation was now essentially rewritten, it became important to test that the embeddings were as expected.
This is where the surprise came in; reading the same image in Python and Rust gave different pixel values. It took a while to understand this. I went about gradually checking various parts of the code to understand the cause of the disparity, finally narrowing it down to the decoding bits.
Take this image for example:

Below are some of the pixel values gotten from reading the image in Python and in Rust, the array format is (number_of_channels, image_height, image_width). If you look closely, you will see the differences in pixel values. I tried to make some of the differing numbers in bold, so they are easier to identify:
![]()
These differences in pixel values are not visible when the images are rendered; from that angle it is not a big deal. So you may ask:
If the differences are not visible, why is it important to be concerned?
Answer: It becomes harder to test the correctness of the embeddings using the full pipeline.
The pixel values may pass through preprocessing, then go into the models for embedding generation, at which point the effect becomes more apparent.
To make the message clearer, here are the embeddings gotten from sending the preprocessed values into the CLIP Vision model:

Do you observe the disparity in the embedding values? There is a mix of small and big differences in the values; my guess—which may be a good idea to confirm—is that both embeddings are very close in the embedding space, making them similar enough to be substitutes.
Takes a break from writing to confirm hypothesis.
The similarity score between both embeddings is 0.967, so they are close enough to be considered alternatives.
Returns to writing.
From the machine learning perspective, this variation is not an issue; however, from the software engineering point of view, it is. How can I verify that the custom implementation—the one in Rust—is doing what I expect it to do? Especially as the output differs from the Python one, and I can’t also tell what the magnitude of the difference may be.
So what did I do about this issue?
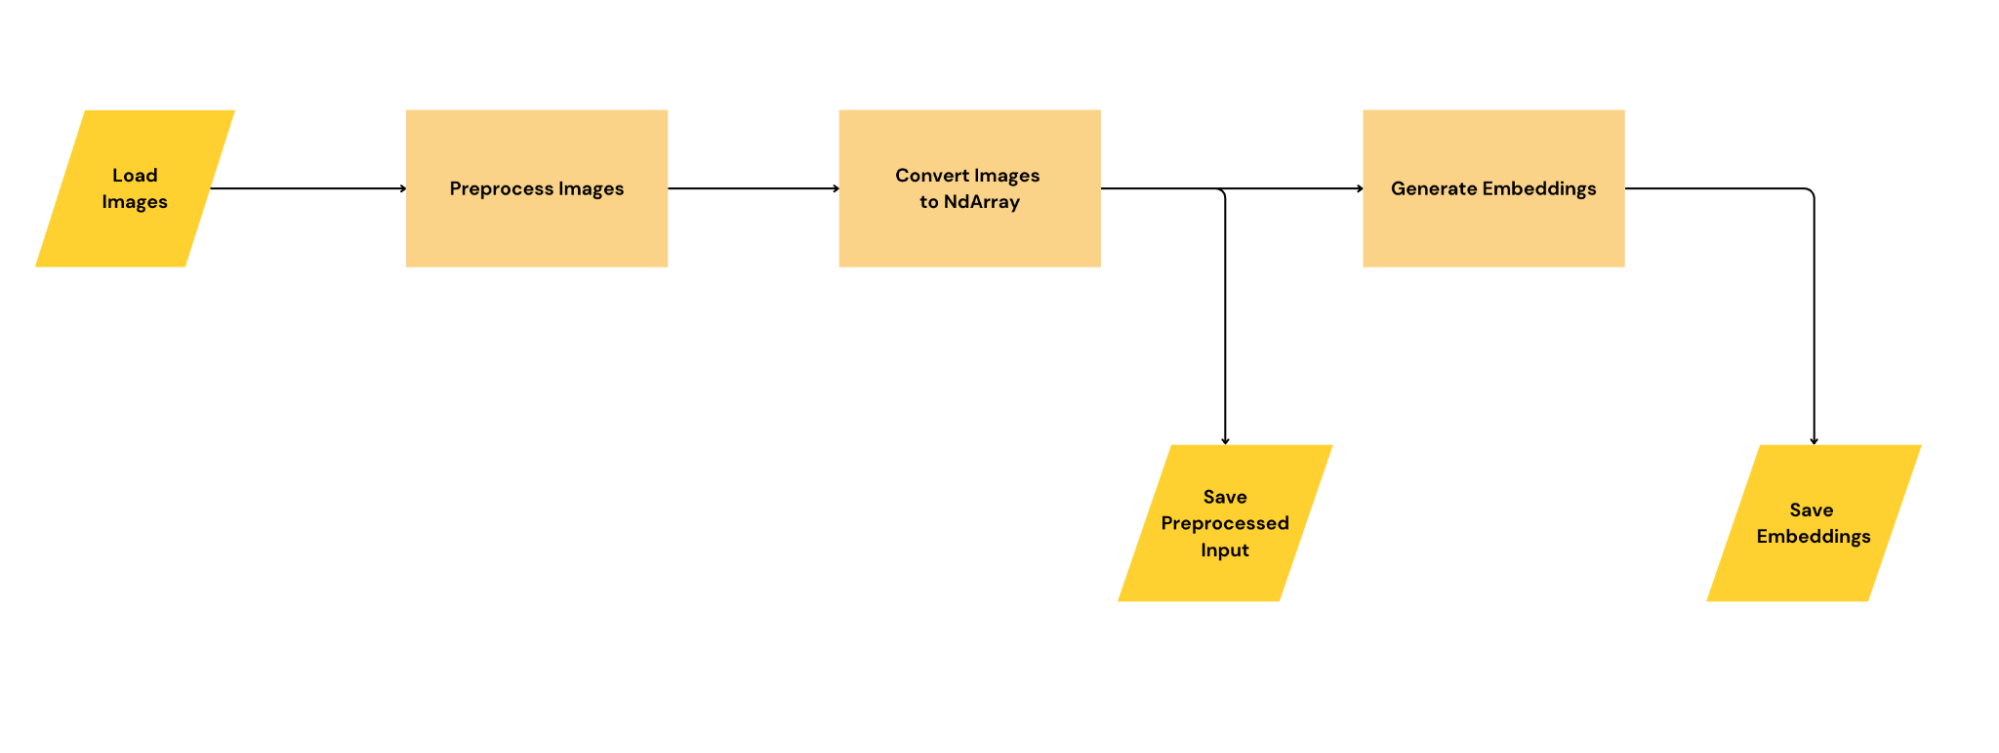
On the Python side, I:
- Extracted the preprocessed input to the model as a NumPy array.
- Extracted the output of the model as a NumPy array.
- Saved both arrays as an
.npzfile.

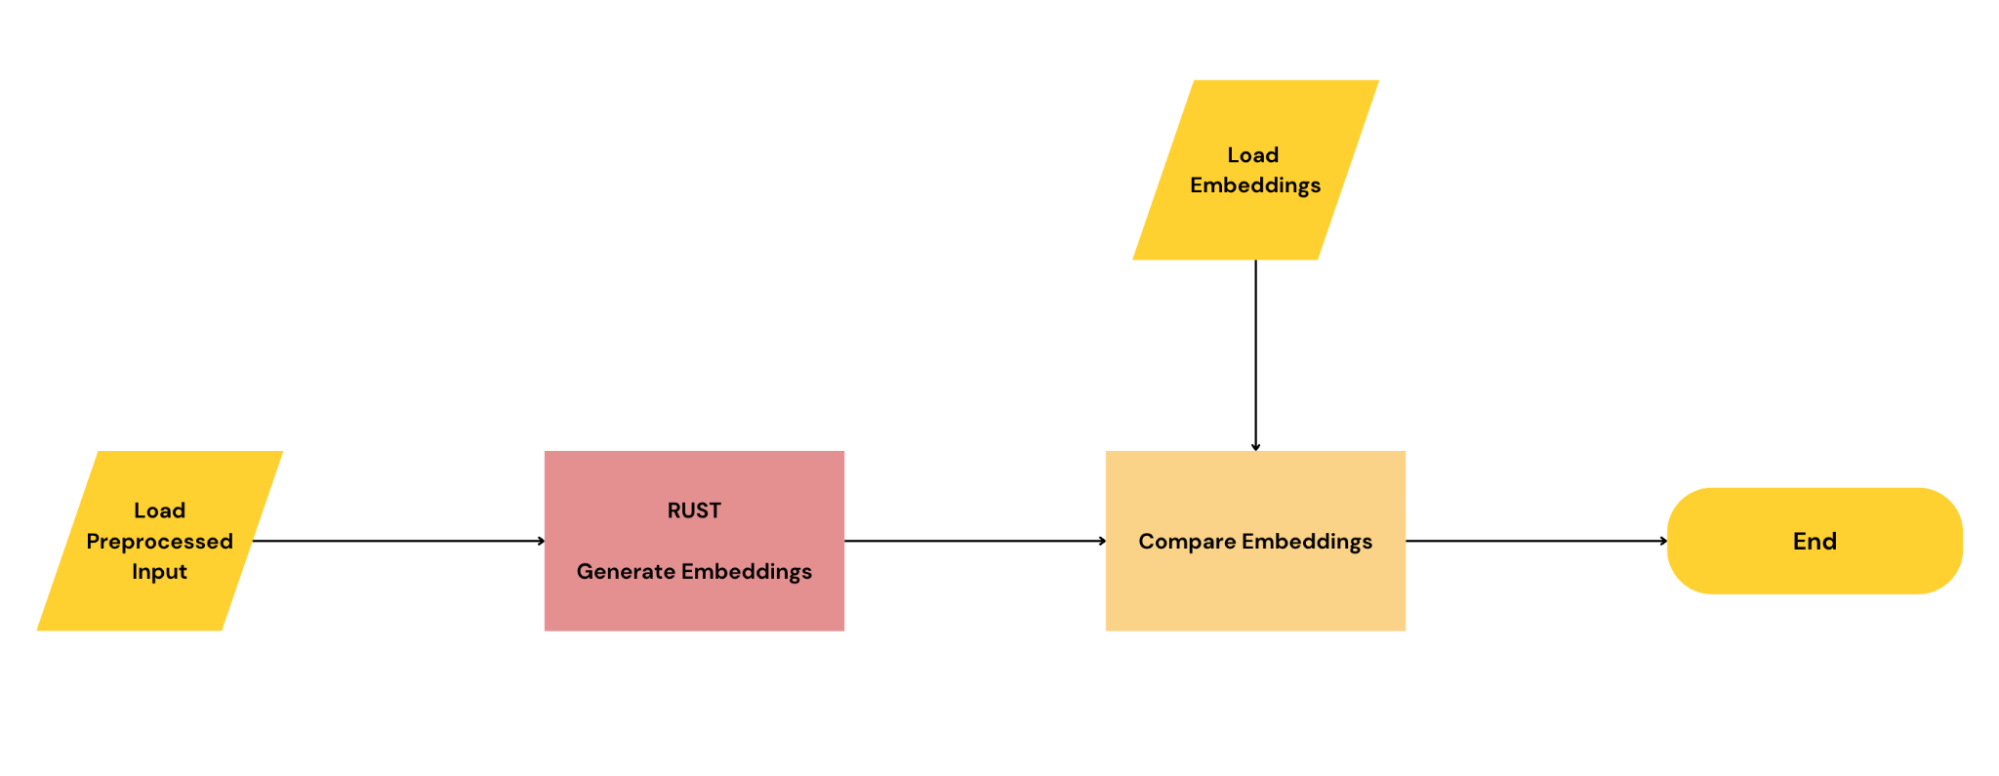
On the Rust side, I:
- Assumed that the image decoding part of the code is working as expected; that code is largely from Rust’s image crate, so it is pretty much a standard.
- Isolated the inference part of the Rust pipeline.
- Loaded the saved arrays i.e., the
.npzfile, using a crate like npyz. - Sent the preprocessed input into the isolated Rust inference code.
- Verified that the output of the Rust inference and that of the Python inference are the same.

By doing this, I was able to verify that the inference code was working as expected. This setup could also be made into a unit test, using the preprocessed input and output from Python’s side of things as mocks.
The main lesson here is to beware of the difference in decoding implementations across languages and libraries for various forms of data. The caution is not necessarily due to huge differences in implementation—heck, it may even be that—but because the variance will propagate down your pipeline. When you finally notice the disparity, it can cause sleepless nights trying to understand the root cause. Finally, if you come across an issue like this, find a way to isolate and test the important parts.
The Dip in Similarity Scores for Image-Text Data
When working on Ahnlich-ai, the team first catered to implementing functionality that converts text to embeddings, after which we worked on one to convert images to embeddings. The addition of the images-to-embeddings functionality paved the way for multimodal search use cases.
However, here is what we noticed: when we tried to check for the similarity between texts or between images, the scores would be within a “normal range.” However, when we tried to do this across modalities, say between images and texts, the scores would be strangely low.
Given a football-themed setup like this:
Doc 1: “An event is ongoing on the green field.”
Doc 2: “A football match happens between two teams.”
Doc 3: “Wayne Rooney’s famous overhead.”
Then a text query like:
“Let us get the ball rolling.”
And an image query like:

Before looking at the similarity scores, anyone with some football knowledge can tell that the image query is more similar to the documents than the text query.
NB: In this example, the images and texts are converted into embeddings using the CLIP Vision and CLIP Text models, respectively.
Let’s see the similarity scores for text-text data:
[("An event is ongoing on the green field.", Similarity(value=0.828507)),
("A football match happens between two teams.", Similarity(value=0.76724356)),
("Wayne Rooney"s famous overhead.", Similarity(value=0.62843007))]
You see how the values are all above 0.5?
Now let’s see the similarity scores for text-image data:
[("Wayne Rooney's famous overhead.", Similarity(value=0.2871881)),
("A football match happens between two teams.", Similarity(value=0.26372734)),
("An event is ongoing on the green field.", Similarity(value=0.18715198))]
Do you notice how the scores dropped?
All the scores from the text-text similarity are higher than the scores from the text-image similarity, despite the image query being more relevant than the text query. One thing to note is that the model seems to understand the context; it ranks "Wayne Rooney's famous overhead." above the rest, and that is correct.
The issue with low scores was quite surprising, as it initially seemed to be due to a bug somewhere. I looked into the code, scouring for explanations but did not find any. In the end, I found explanations outside the code.
Before I go into that, you may ask:
Why is the drop in scores important if the results are still ranked in an order of similarity?
That is since the texts for these images are already ranked like:
["Wayne Rooney's famous overhead.",
"A football match happens between two teams.",
"An event is ongoing on the green field."]
Why does it matter what the scores are?
One answer is thresholds. If one builds software and works on the assumption that items above a certain threshold are similar enough to be shown to the user, an issue like this would need a change in threshold values to surface relevant items. Let’s say the threshold is agreed upon to be 0.8, and then the image-text scenario returns a score less than 0.3, the threshold will require some modification to fit the domain.
Another answer is interpretability. In the described scenario, following the scores would lead to an interpretation that the text is more similar than the image to the documents, which is wrong. It is hard enough to interpret similarity scores; an issue like this makes it even harder.
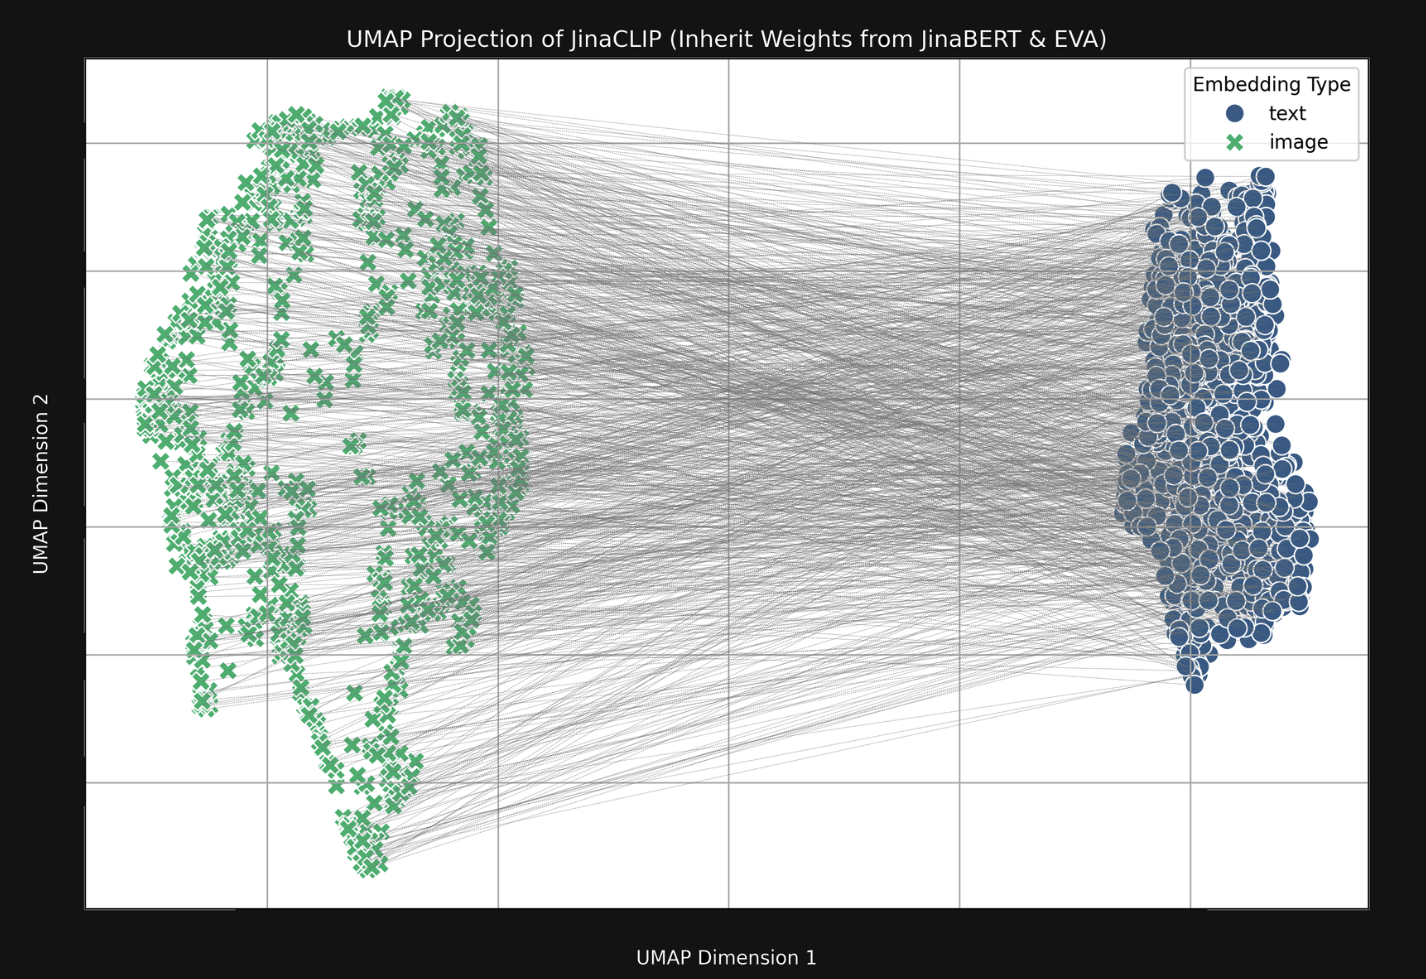
So what is the cause of this issue? The answer is in the modality gap.
A summary of the linked article can be described via this image:

The embeddings of a given medium tend to cluster in an area significantly different from other mediums. Hence, the items within a medium tend to be closer to each other and, as a result, have higher scores when compared to items in other mediums.
There are a couple of reasons for this:
One is the difference in models. Each data modality (image and text) is processed by its own encoder with separate architecture and weight initializations. For example, CLIP typically uses a vision transformer or ResNet for images and a text transformer for textual data. While CLIP trains these models together to align their embeddings, the fact that the embeddings originate from two distinct encoders inherently creates a modality gap. This gap arises because the two encoders may capture different kinds of features due to their distinct architectures despite being trained with a shared goal.
Another is the loss function. The contrastive loss function used in training CLIP models treats the data as a batch of image-text pairs. For each image, there is one associated text (to form a positive pair), and all other texts in the batch are treated as negatives. For a batch of size N, this means each image is paired with one true positive text and N−1 negative texts. The loss aims to maximize the similarity between embeddings of the positive pairs while minimizing it for the negatives. However, this binary “positive vs. negative” treatment can oversimplify the alignment process. Some of the “negative” texts might still have partial relevance to the image but are treated as entirely dissimilar. This limitation can create noise in the optimization process and make it harder for the model to properly align images and texts.
Now that you know why this happens, what was done to fix this issue? Nothing, at least not yet.
However, it is something the development team is aware of and is a known issue in the machine learning community. While doing further research for writing this article, I came across some papers like Mind the Gap: Understanding the Modality Gap in Multi-modal Contrastive Representation Learning and It’s Not a Modality Gap: Characterizing and Addressing the Contrastive Gap which look into further understanding the cause of this gap and potential solutions.
The Importance of Model-Specific Preprocessing
Given my experience in machine learning, I would not exactly say I found it surprising to see that model-specific processing is important. Instead, I am including it in this article because I think it is beneficial to still point it out, and not just the idea but the magnitude of its importance.
Earlier in the article, I mentioned having to do custom inference implementations while working on Ahnlich-ai due to the tool’s flexibility requirement. Part of the custom implementations was adding logic to do model-specific preprocessing.
Image encoder models will often work provided the image dimensions meet the requirements. However, if you want to get the best out of these models, you have to apply their specific preprocessing instructions. Some of these operations include normalization, resizing, and rescaling images to get them in the best format for inference, not just to meet the dimension requirement. Thanks to Huggingface, you would usually find the preprocess config in the preprocessor_config.json file for the target model; for example, this link contains the preprocessing instructions for the ResNet50.
Writing code to perform these specific operations can take some effort, especially since it should work for various models. So in the spirit of prototyping, the team decided to only implement the resizing transformation, ensuring that all images meet the dimension requirement—this is 224 x 224 for the ResNet50. As expected, this worked, and the ranking order made sense when eyeballing some results; however, the similarity scores were weird, unusually high.
Let’s look at the following setup to fully understand what “weird” means in context.
Say we have the following images to be indexed:

From left to right, I will refer to the images as Image1, Image2, Image3 and Image4.
And we have the following query image:

This is a basketball-themed example, and without running the query, I would have a couple of expectations:
Image3should be ranked first since it is basketball being played as in the query image.Image1should be ranked second since it is an Air Jordan and it is related to the individual in the query image, Michael Jordan.Image2andImage4can be ranked third and fourth in any order.
So how do the images and similarity scores fare when running only the resizing operation?
[("Image3", Similarity(value=0.99914294)),
("Image1", Similarity(value=0.9987868)),
("Image4", Similarity(value=0.9984776)),
("Image2", Similarity(value=0.9978745))]
The rankings look as expected, but the numbers “feel off.” Why are they all that high?
I believe that possessing some knowledge of the domain and data is the only way to develop this kind of “feel” and intuition. For me, this experience further cements the importance of understanding the data and its transforms as a machine learning engineer.
I do not know for sure why they are all that high; that is a question that probably deserves an answer. However, on implementing the model-specific preprocessing operations, here is how the images and similarity scores turn out:
[("Image3", Similarity(value=0.6100306)),
("Image1", Similarity(value=0.25423393)),
("Image4", Similarity(value=0.24817139)),
("Image2", Similarity(value=0.17258035))]
The similarity scores are distinct and easier to explain. The scores for Image1 and Image4 are much closer than I would like, but this is a much better result compared to working without the model-specific preprocessing operations.
It is not surprising that the results are better, but I did not expect the results to be this different. I do not think the approach of only using the resizing operation as done on this project was a bad decision; it served its purpose. However, it did help me see that the more processors are tailored to a model’s strength, the better.
There’s not much to take away from here other than the need to take preprocessing as seriously as the inference logic itself. Considering that the outputs of the preprocessing will be going into the model, one can say it dictates the quality of the model’s results.
An Extra Surprise: Rust’s Error Handling Philosophy
This is not exactly a surprise related to the embedding service; it is more about the language used: Rust.
I was initially going to call this “Rust’s Verbosity,” because the language is actually verbose compared to Python. However, there’s not much value in saying that; statically typed programming languages tend to be verbose.
It occurred to me that it is not exactly Rust’s verbosity that put me off at the start, but dealing with the language’s approach to handling errors. One of Rust’s main selling points is its ability to nudge programmers to write robust code, and this is thanks to its error handling philosophy.
Here is a trivial example that I hope conveys why I initially struggled with it.
Let’s imagine I want to read the first line of a file in Python; I can simply do this:
def read_first_line(filepath):
    with open(filepath, 'r') as file:
        line = file.readline()
        return line
This code will run in Python, even if I can think of some reasons why it can crash. Such as:
filepathmay be the wrong data type, e.g., it may be a boolean data type.- There may be issues opening the file from the
filepath, e.g., if the file does not exist. - There may be issues reading the file, e.g., incorrect file formatting.
The thing is, if I am in experimentation mode, I do not care much about handling potential failure cases; I simply want to just get something that works. So in this case, I would only test with a file that I expect to work to avoid dealing with the error handling detail.
However, if I were to do something similar in Rust, it would fail.
The equivalent would be something like:
fn read_first_line(filepath: &str) -> String {
    let file = File::open(filepath);

    let mut reader = BufReader::new(file);
    let mut line = String::new();
    reader.read_line(&mut line);
    line
}
But this fails with:
21 |     let mut reader = BufReader::new(file);
   |                      -------------- ^^^^ the trait `std::io::Read` is not implemented for `Result<File, std::io::Error>`
   |                      |
   |                      required by a bound introduced by this call
This simply means that File::open(filepath) is expected to return a Result object that can either be the File object or an io::Error. In other words, Rust wants you to decide how to deal with the situation where the file cannot be opened. Rust will also make a similar complaint for the reader.read_line(&mut line) line if I handle that initial case.
In the end, the code may look something like:
fn read_first_line(filepath: &str) -> Result<String, String> {
    let file = File::open(filepath).map_err(|e| format!("Failed to open file: {}", e))?;

    let mut reader = BufReader::new(file);
    let mut line = String::new();
    reader.read_line(&mut line).map_err(|e| format!("Failed to read from file: {}", e))?;
    Ok(line)
}
Changes needed to get this to work are:
Result<String, String>: To show that the function is expected to possibly fail..map_err(|e| format!("Failed to open file: {}", e))?: To properly handle the case where the file cannot be opened..map_err(|e| format!("Failed to read from file: {}", e))?: To properly handle the case where the file cannot be read.Ok(line): The content of the file is wrapped inOk<T>, indicating that it was read successfully.
This example is trivial, but I hope it passes the message: Rust requires me to consciously decide how I want to handle the potential failure modes, even if I am not interested in doing that yet.
To be fair, Rust does give some room via unwrap and expect to do prototyping work without having to write detailed error-handling code immediately. Using unwrap and expect means you allow your program to stop execution by triggering a panic! if the code encounters an error. The expect method is similar to unwrap, except that it allows you to provide a custom error message when a panic! occurs.
Using unwrap will give code that looks something like:
fn read_first_line(filepath: &str) -> String {
    let file = File::open(filepath).unwrap();

    let mut reader = BufReader::new(file);
    let mut line = String::new();
    reader.read_line(&mut line).unwrap();
    line
}
The only changes here are the addition of unwraps where necessary. As a beginner in the language, I found Rust’s approach to error handling surprising and tedious, so unwrap came in very handy for me. It helps with exploratory work, leaving error handling for later. The key point here is “leaving error handling for later”, meaning that it should be properly taken care of; unwraps and expects should not be left in the code.
I believe Rust’s error handling philosophy is great, and as I went further with the project, I would find cases where I was genuinely grateful I had handled the possible failure modes. So I am fully onboard with it, and I think it fits in nicely when looking to build robust software as a result.
Summary
It took a while for me to come up with a title for this article. I was not quite sure what title would do justice to the information I was about to share, and to be honest, I am still not certain at this point. So I will give up on that and just get to the summary.
In this article, I wrote about three surprises I encountered while building Ahnlich-ai, the embedding service for Ahnlich. The main points were:
- Varying Image Decoding Implementations: The approach to reading images may vary across languages and libraries. Be vigilant as this could result in pixel discrepancies and spread throughout your data pipeline.
- Dip in Similarity Scores for Image-Text Data: There is a gap that tends to exist in the embedding space, visibly separating data from different modality types. If you experience low similarity scores between images and texts, that may just be the cause.
- Importance of Model-Specific Preprocessing: Data is king, in its raw and processed form. Be meticulous about how you get to process data before feeding it into your model; it can have massive effects.
I then included an extra point, talking about how I struggled to work with Rust’s error handling approach early on. If I sound like I no longer have issues with it, I’ll be kidding; that said, I like it. This is the first of three articles, and I hope you learned a thing or two from it. See you in the next one.


Leave a comment